Contents
When winter descends upon us, many outdoor enthusiasts find themselves drawn to frozen lakes and ponds for ice fishing, skating, or snowmobiling. However, venturing onto ice without knowing its thickness can be extremely hazardous.
Understanding how to measure ice thickness is crucial for ensuring personal safety and the safety of others. Ice conditions can vary significantly based on temperature fluctuations, water currents, and local weather patterns, which makes regular assessments vital.
In this article, we’ll provide practical techniques for measuring ice thickness to help you enjoy winter activities safely and confidently.
Measuring ice thickness isn’t just about knowing when it’s safe to step out; it’s about understanding the science behind ice formation and recognizing hazardous conditions. This comprehensive guide will walk you through various methods of measuring ice thickness, tips for assessing ice integrity, and important safety considerations.
By following these steps, you’ll equip yourself with the knowledge to make informed decisions, ensuring a safe winter experience for you and those around you.
Why Measuring Ice Thickness Matters
Knowing how thick the ice is can be the difference between a safe outing and a potentially life-threatening situation. Ice can appear thick yet be dangerously weak, leading to falls through the surface. Understanding ice safety is crucial, especially in areas where ice thickness varies due to underlying currents or changes in temperature.
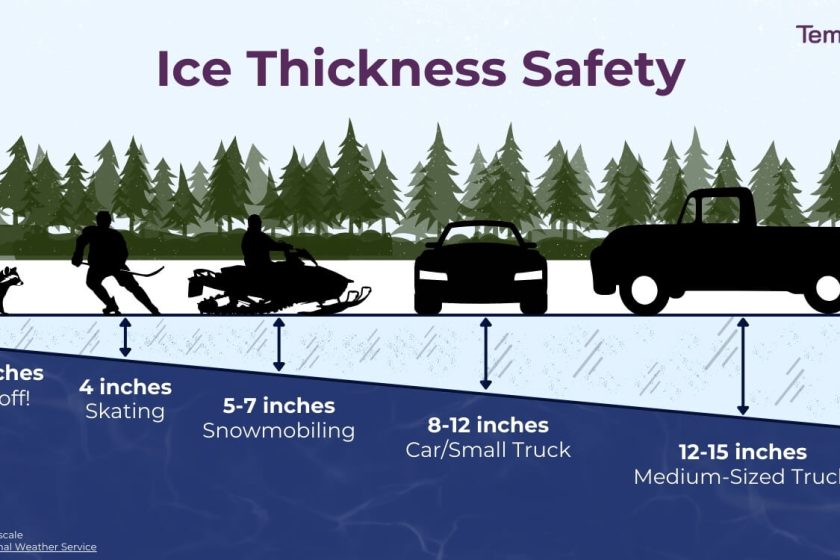
As a rule of thumb, different activities require different minimum ice thickness levels. Here are some safety benchmarks to consider:
- 2 inches: Ice is generally safe for walking.
- 3-4 inches: Safe for ice fishing or snowmobiling.
- 5-7 inches: Safe for small vehicles.
- 8-12 inches: Safe for medium trucks.
With such significant variations, knowing the thickness of the ice is essential for making informed decisions.
Tools and Techniques for Measuring Ice Thickness
Measuring ice thickness can be done using a few different tools and techniques, each offering varying degrees of accuracy. Here are some effective methods to consider:
Using a Tape Measure or Ice Auger
The most straightforward method to check ice thickness is with a tape measure or an ice auger. Here’s how:
- Select a location: Choose a spot away from any areas that may be affected by currents or other hazards.
- Drill a hole: If using an auger, carefully drill into the ice until you reach the water surface.
- Measure: Use your tape measure to determine the thickness of the ice from the top surface to the water level.
Ensure to drill multiple holes in various locations, as ice thickness can vary significantly over short distances.
Using a Probe Rod
A probe rod is another effective tool for measuring ice thickness. This method is especially practical for ice that is either very thin or thick:
- Construct a probe: Use a long, sturdy rod with a weighted end (such as a bolt) to penetrate the ice.
- Insert the probe: Carefully push the rod through the ice until it reaches the water below. Make sure to apply even pressure.
- Measure the ice thickness: Mark where the rod meets the ice surface, then pull it out. Measure the distance from the mark to the bottom of the rod.
Probe rods can be particularly useful if you’re in remote areas where traditional tools may not be available.
Assessing Ice Integrity
Knowing the thickness of the ice is important, but assessing its overall integrity is equally crucial. Here are several factors to consider:
Visual and Auditory Indicators
Observing the ice and listening to it can provide valuable clues about its safety. Look for:
- Color: Clear blue ice is generally stronger than cloudy or white ice.
- Crisp sounds: If the ice makes cracking noises, it could indicate weakness.
- Surface condition: Avoid areas with slush or water on top, as they can signal weak spots.
Temperature and Weather Considerations
The atmospheric conditions leading up to your outing play a significant role in ice safety. Consider the following:
- Temperature: Above-freezing temperatures can weaken ice quickly.
- Recent precipitation: Snow cover can insulate the ice, preventing it from freezing solid.
- Weather patterns: A sudden warm spell can create dangerous conditions even if the ice seemed stable before.
Safety Considerations While Measuring Ice Thickness
Before venturing out to measure ice thickness, prioritize safety. Here are essential precautions to keep in mind:
Personal Safety Gear
When measuring ice thickness, always wear proper safety gear to protect yourself:
- Wear a life jacket: This is vital if the ice is thin or the conditions seem questionable.
- Dress in layers: Ensure you stay warm and dry if you do fall through.
- Bring safety equipment: Carry ice picks or rescue ropes, just in case.
Buddy System
Never venture onto the ice alone. Always bring a companion for safety:
- Stay connected: Ensure your buddy is within sight and can assist you if needed.
- Communicate: Regularly discuss plans and stay alert for any potential hazards.
By taking these precautions seriously, you can significantly enhance your safety while enjoying winter activities. Measuring ice thickness is an essential skill that should never be overlooked.
In summary, measuring ice thickness is a critical skill for anyone looking to partake in winter activities safely. By understanding the importance of ice thickness, employing reliable measurement techniques, assessing the ice’s integrity, and prioritizing safety, you can navigate frozen surfaces with confidence. Remember to keep an eye on the weather and always have a plan in place for emergencies. Stay safe, and enjoy the winter wonderland responsibly!

